|
|

- Install
- Overview
- Description
- The Options box
- The wavetable editor
- The waveform editor
- The spectrum editor
- The spectral map
- Generators
- The scale editor
- The modules control box
- Use the Quantix-8
- Dump Wavetable/banks
- CV-Quantizer
- Wavetable Oscillator
- CV-Sequencer
- Sample Player
- Midi to CV interface
- Zero crossing detector
- MIDI
- Wiring module(s)
- Configuration
- Real time edition
- Implementation chart
- Troubleshooting
Install
To install the software
- Unzip to any folder on your hard drive.
- Open this folder and double clic on the Quantix8_v1xx.reg file to set default parameters
- Confirm ' write to the register base ' when asked.
- Run Quantix8_v1xx.exe.
If an "Invalid Device ID" error box appear this mean there is no MDI port recognized by the software on your computer. You need to add the correct hardware ( MIDI PCI or MPU 401 compatible card ) prior to run the software again
If you get any other of message boxes , just clic on the Ok button , it is probably a parameter not yet set into the register base . This will happen only at the first time, specialy if you have not installed the *.reg file , see point 2).
To uninstall :
- Erase the folder ...
- For a complete uninstall ( your settings will be loosed ) erase the register key USERKEY\SOFTWARE\PAPAREIL\QUANTIX8
Overview
The Quantix-8 software use classic windows object :for a large part but there also an homemade one that you will find a little bit everywhere into the software.
The Label Pot 
It is the object used to set numerical values or parameters. In some special cases it also display notes numbers or various text. It work with the mouse or/and the keyboard.
- To decrease a value of 1: clic on the pot with the Left button..
- To increase a value of 1: clic on the pot with the Right button.
- To decrease/ increase increase by step of 10 do the same as 1) or 2) and press the Shift key at the same time
- To decrease/ increase a value faster : clic on the pot with the Left button, keep it pressed and move the mouse down/up ...
The value will be changed in real time . In most of the case the mouse movement detection is vertical ...
- To set the value to minimum : clic on pot with the left button, keep it pressed and clic on the rigth button too .
Now release the left button first and the right just after ...
- To set the value to maximum :same as previous but you swap left and right mouse button in the sentence... no joke :)
Files format
The Quantix-8 software use mainly the 8 bits binary (*.BIN) file format for waveforms and modules parameters.
Other files are ASCII text files even if they do not have the *.txt extension, ie : the scale list preset file named sp.kub ...
8bits BIN files format is very simple : bytes are stored one after each other. So a 256 bytes 8bits waveform is stored in a 256byte BIN file ... Wavetable or Bank files are just sets of waveforms , stored the same way, one waveform of 256 byte after the other one... As there is here 2048 waveforms, of 256 bytes each, into the wavetable the file size is 512KBytes =512*1024=2048*256...
Audio signal or other datas stored into the waveforms are encoded in 8 bits unsigned. this mean numbers are coded on a range of 0..256 = full 8 bit ( and not -127/+128 = 7 bits +1sign bit = signed format) . Anyway it is very simple to convert signed files to unsigned with the wavetable editor.
The software load file function do not detect file extensions , this mean that you can load almost any kind of files into the Quantix-8 wavetable ... Example : try to load a long ASCII text file intop the wavetable and see the result ....It is a very good way to produce (pseudo) random CV sequences or waveforms!
Description
The Options box
This dialog box contain is used for the sofware configuration. This box is called from the Wavetable editor menu ' View'+ 'Options' or with the F2 key . Settings are automaticaly saved by the software.
The color tabsheet allow to set colors for editors windows . In the editor panel, Wave is the Waveform editor, Ampl and Phase are for the Spectrum editor displays. To change a color left clic on the colored panel. This open the Windows(tm) color selector .To set Gradients off , set the 'steps' pots to zero
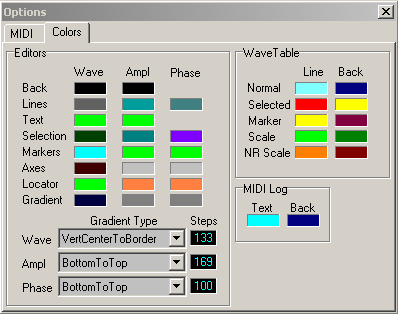
The MIDI tabsheet is to set device ports and main parameters.
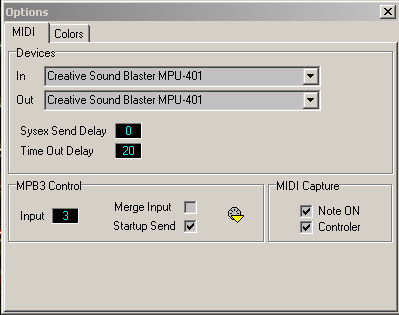
Devices contain two menu box with a list of available MIDI drivers on the Windows OS. Choose the one where the module is plugged. The software do not share MIDI drivers , this mean that yu cannot use this software with another one on the same MIDI device ports...
Sysex Send Delay is a parameter to increase the delay between two sysex message to send datas to the Quantix-8 . This is useful for fast MIDI systems/cpu but it will also increase the wavetable time tranfert who is already quite long... To use if you have no other choices else keep it to zero...
Time Out Delay is the time before the Time Out error occur to exit the loop when the sofware is waiting after an answer of the Quantix-8 module. Increase it to 30 ( or more ) if you get frequent 'time out errors' ...This parameter do not slow down MIDI transfert unlike the previous one...
MPB3 controls are to drive the MPB3 Midi Patchbay automaticaly . If you do not have an MPB3 plugged on your MIDI system forget this panel...
MIDI Capture contain two checkbox to filter the MIDI input when recording MIDI into the waveform editor . If notes and /or controlers are checked , they will be available to record.
The Wavetable Editor
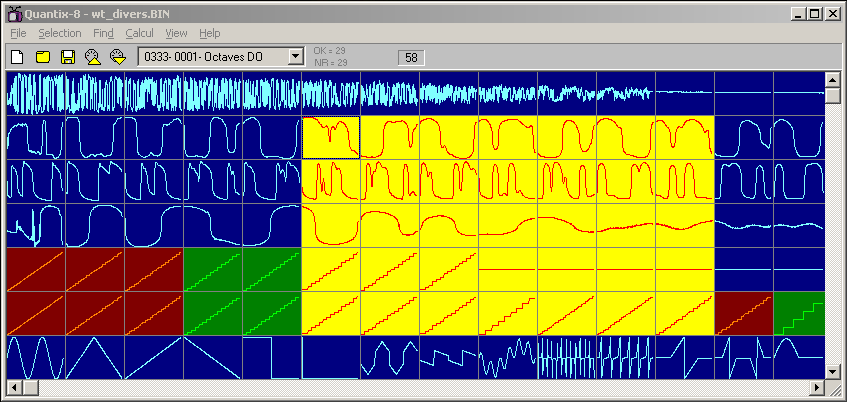
Here is the main windows of the Quantix-8 software. This resizeable window is composed of the main menu bar , the tool bar and the wavetable container/display.
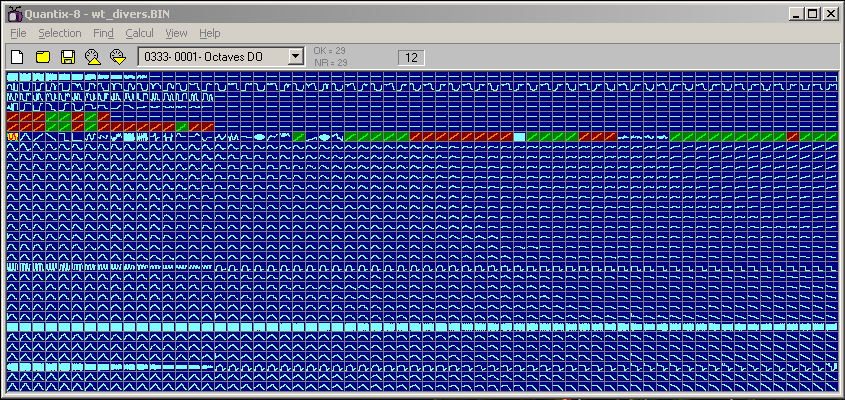
The wavetable display is a visual reproduction of the 4Mbits RAM chip of the Quantix-8 module, with the same organisation of 32 banks ( rows) of 64 waveforms ( columns ) So there is 2048 little rectangle squares on this display, each contain a waveform of 256 bytes.
Rectangles size is set manualy with the grey labelpot in the middle of the tool bar (set on 12 and 58 on picures) . If the windows is not big enough to display all scales scroll bars will appears on both size. If the View\Autosize menu is checked the window size will be automaticaly adjusted to the best fit display.
Waveforms colors are set into the Options box (F2). In present pictures it is :
- Blue/Turquoise = Normal waveforms, usualy audio signal ( part of a sample ) or synthesised waveform
- Red/Orange = Detected but unidentified/irregular quantizer scales
- Green/Lime = Identified quantizer scales
- Yellow/Red = Selected waveforms. Functions of the Selection menu will work with them ...
- Dark Red/Yellow = Tagged waveforms - result of a 'find' operation or automatic selection ...
Mouse operations on the wavetable display :
- Left clic = select the waveform under the mouse cursor and load it into the waveform editor .
- Left clic drag & drop = select many waveforms . the last selected one is loaded into the waveform editor
- Right clic drag & drop= swap selected waveforms with ones where the mouse has been released A ghost rectancle of selected waveforms is displayed and the mouse cursor change too.
- Right clic +CTRL key drag & drop = copy selected waveforms where the mouse has been released. A ghost rectancle of selected waveforms is displayed and the mouse cursor change too.
Tool bar items, from left to rigth
- 5 buttons , respectively new, load, save, midi send and receive. They are short cut of the main menu items...
- the 'detected scales' list with just nearby 2 text labels
Ok= xx is the number of identified scales into the wavetable.
NR=yy is the number of detected but Not Recognised scales into the wavetable
- one pot label who is a 'easy' access to zoom in/out waveforms display size...
File menu
All following functions can apply to Bank or to the full wavetable. A little dialog box is displayed each time to select where to apply the function .
- New = clear the wavetable editor buffers .
- Load = load a BIN file . A complete wavetable is a 512k file ... The file is also scanned with the scales detector . Detected scales are listed with their names into the detected scales list on the toolbar for a quick access.
In Bank mode , the destination bank to load datas is the one who contain a selected waveform
- Save = idem but to save files.
- Send to MIDI = send a wavetable or a bank to MIDI ( write the ram chip )
- Receive from MIDI = idem but to receive from the Quantix-8 module ( read the ram chip)
- Exit = To quit the software ...
Selection menu
Selection menu functions work only on the selected waveforms rectangle ( yellow background waveforms)
- Select All = to select/unselect all waveforms into the wavetable display
- Select Bank = if checked this menu force the waveform selection to one bank only. It also limit some of the Calcul menu functions to work on one Bank only .
- Send to MIDI = send selected waveforms to MIDI ( write the ram chip )
- Receive from MIDI = receive selected waveforms from MIDI ( read the ram chip)
- Delete = to erase selected waveforms
- Reverse = to reverse selected waveforms
- Unsigned = sign/unsign selected waveforms
- Linear morphing = do a linear morphing of the waveforms located at each angle of the selection rectangle . To morph the entire wavetable , select all waveforms first then morph them ...
- Tonal Morphing = sort selected waveforms by spectrums comparison ( magnitudes and phase ). The one with the lowest frequency first and hi freq/noise density ones at the end . This function use the Spectral map contain to compute the sort . Use 'Restore Order' in the Calcul menu to cancel effect of the tonal morphing ...
Find menu
Find function are to search and tag waveforms over the entire wavetable . They use Markers color to tag waveforms matching the search criteria. Markers are independant of the selection . Markers are not saved into the wavetable files
- Buffer = compare each waveform into the wavetable to the one into the Waveform editor . Tag if equal
- Scales = Search and identify quantizer scales
- Ramp = Search for Ramp style waveforms
- Empty = Search for empty locations
- Doubles = compare all waveforms together to dedect doubles
- Double Mark First = If a double is detected into the the wavetable , tag the first exemplary found
- Clear Markers = cleanup of all markers
Calcul menu
This menu provide a set of functions to fill the wavetable automaticaly, and one to re-order the wavetable....
- Scales 0..2k = compute all scales with the scale generator from number 0 to 2048, and fill the wavetable .
- Scales 2k..4k = idem but scales from 2048 to 4096
- Function = use the Function Generator to fill the wavetable ( not very useful as this , i admit ...)
- Fast Random = Fill the wavetable with the Random function generator . Use level, Freq and Pwm parameters in the function Generator . To try : Freq = 8, PWM = 32, Level = 128, and clic the Fast random menu ...
- Window Function = compute the 'FFT window function' set . Mostly for dev/dbug purposes...
- Restore order = restore waveforms to their original position into the wavetable, after a sort
View menu
- Zoom in/out = to increase/decrease the waveform display rectangle size
- Minimum = set automaticaly the Wavetable windows to the minimum size
- Autosize = if checked the Wavetable window size is automaticaly adjusted to fit the best
- Other items in this menu are to show /hide editors windows and dialog boxes.
The Waveform Editor
It is the buffer to edit one 8 bits waveform of 256 bytes. The waveform is displayed in the tim /amplitude domain .
Contain a menu bar , the tool bar and the waveform editor /display area.
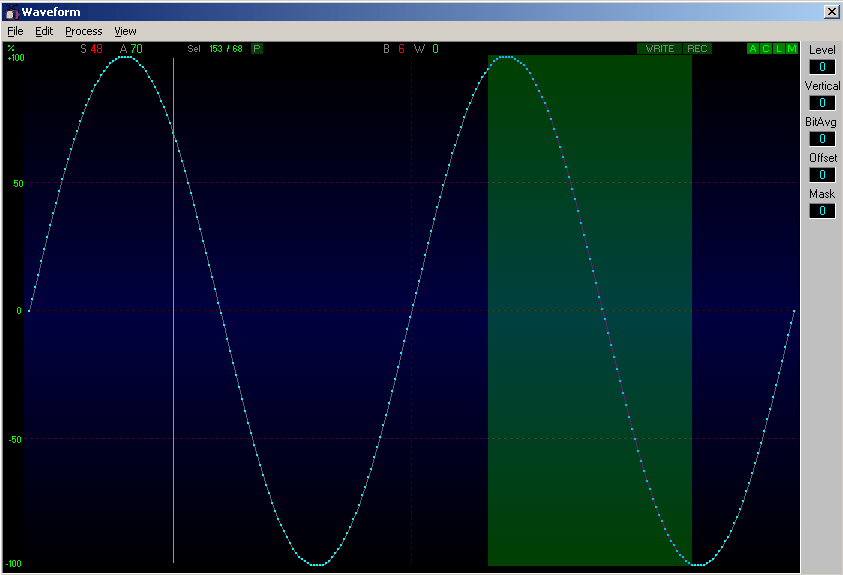
The waveform display is the graphic area to display and edit one 8 bits waveform of 256 bytes.
- the vertical axis (Y) is the amplitude ( = output voltage) .
- the horizontal axis (X) is the byte number into the waveform. range is 0 to 255 ( 8 bits).
- the vertical Green/lime bar is the Locator bar : used to point to any position into the waveform. Set by mouse or by toolbar label pots
- the dark green rectangle is the selection area , set by mouse or from the toolbar label pots.
Mouse operations on the waveform display :
- Left clic and drag = set/unset the selection rectangle.
- Left clic on the Locator and drag = move the locator manualy.
- Right clic and drag = draw waveform curve with the mouse cursor
Toolbar items, from left to rigth
- % (or DCV) = the vertical axis legend
- S48 = Label pot - Locator X position ( 0..255) .
- A70 = Label pot - Amplitude of the waveform at the locator position. In the picture the locator is set at the byte number 48 into the waveform. and the byte #48 contain the value 70 ...
- Sel 153/68 = two Label pots to set the selection rectangle : Respectively the selection start point and lenght.
- B6 W0 = two very important Label pots . They are the Bank and Wave selectors to choose the waveform to edit into the wavetable . They are automaticaly set when a waveform is loaded by a mouse clic from the wavetable display. They are software equivalents of the Bank and Wave pots of the Quantix-8 module. Like them they are both assignable to MIDI controlers defined into the 'Control Modules' box.
- WRITE = clic it to write the edited waveform into the wavetable at the Bank and Wave label pots location.
- REC =: activate the MIDI Capture mode to record MIDI notes or controlers to draw the waveform.
- Display config switches :
- A = show /hide X/Yaxis
- C = Draw bars from middle axe- modify the Y axis scale %/dcv
- L = Line or Bar draw mode . Bar mode is slightly faster display
- M = Set dot markers on or off ... No markers draw faster too...
File menu
- New = clear the waveform editor buffers .
- Load = load one waveform . BIN file .
- Save = idem but to save files.
- Send to MIDI = send the edited waveform to MIDI at the location pointed by the B and W pots
- Receive from MIDI = idem but to receive from the Quantix-8 module
Edit menu
- Select All = to select/unselect all the waveforms
- Select 1/2 = to select only 1/2 waveform .
- Center Locator = To automaticaly mùove the locator to the middle or to the start points.
- Cut = cut the selected waveform area
- Copy = copy the selected waveform area into a 'clipboard'
- Paste = paste the 'clipboard' at the locator point.
Process menu
- Reverse = revese the waveform
- Unsigned = convert to Signed /unsigned
- Alternate Right = copy 1/2 waveform right to the 1/2 left
- Alternate Left = copy 1/2 waveform to left the 1/2 right
- Mirror Right = mirror copy 1/2 waveform right to the 1/2 left
- Mirror Left =mirror copy 1/2 waveform to left the 1/2 right
- Scale detection = if checked , activate the Realtime scale detection. If set on , each waveform loaded into the Editor display is analysed. If a known scale is detected , the Scale generator is set with the scales values and a warnig is displayed into the waveform tool bar. This feature slow down real time operations. Desactivate it if not needed.
- FFT Analysis = if checked the spectrum of the edited function is calculated in 'real time ' and the spectrum dispaly/editor is updated too. This feature slow down real time operations.
View menu
- Grid /Edit = Display the value table of the waveform for text edition.
- Control panel = Display real time controls to re-shape the waveform . It use the waveform pointed by the B& W pots and not the editor buffer contain .
- Level = modify the waveform level
- Vertical = adjust both half of the waveform verticaly
- BitAvg = do a bit average computation on the waveform
- Offset = add DC offset to the waveform
- Mask = apply a binary mask value to the waveform ( bit crunching)
The spectrum editor
This window display the edited waveform into a editable 128 harmonics frequency/amplitude-phase spectrum computed by the FFT.
Contain a menu bar , the tool bar and the spectrum editor /display area.
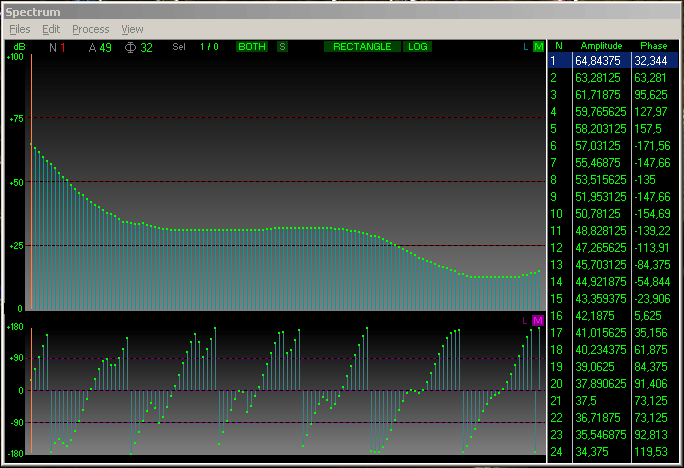
The Spectrum display is the graphic area to display and edit one waveform spectrum.The area is splitted in two graphics the upper one is for the amplitudes and the lower one for phase angles . Both are edited the same way.
- the vertical axis (Y) is the amplitude (% or dB) or phase (+/-180 ° ) depending the graphic.
- the horizontal axis (X) is the harmonic number ( 1..127) . Each harmonic have a amplitude and a phase angle...
- the Orange vertical bars is the locator bar : used to point to any harmonic of the spectrum . Set by mouse or by toolbar label pots
- Selection areas ( no pictured here) , set by mouse or from the toolbar label pots to operate on spectrum parts only.
Mouse operations on the Spectrum display :
- Left clic and drag = set/unset the selection rectangle.
- Left clic on the Locator and drag = move the locator manualy.
- Right clic and drag = draw spectrum curve with the mouse cursor
Toolbar items, from left to rigth
- % or dB= the vertical axis legend for the amplitude graphic.
- N1 = Label pot - Locator X current position. It is the harmonic number ( 1..127)
- A49 = Label pot - Amplitude of the harmonic at the locator position.
- Φ32 = Label pot - Phase of the harmonic at the locator position.
- Sel 1/0 = two Label pots to set the selection rectangle : Respectively the selection start point and lenght.
- BOTH = harmonics selector to limit edition to EVEN , ODD or BOTH( all) harmonics.
- S = this button activate the spectrum R/L shift mode.
- L = displayed only if the S button is ON. If activated this button link Amplitude and Phase L/R shift.
- RECTANGLE =: Label pot - Select the FFT window function for the analysis.
- LOG = if set ON spectrum amplitudes are plotted on a Log scale , else it is a linear scale
File menu
- New = clear the spectrum editor buffers .
- Load = load one spectrum . BIN file .
- Save = idem but to save files.
Edit menu
- Select All = to select/unselect all the spectrum
- Select 1/2 = to select only 1/2 spectrum .
- Center Locator = To automaticaly move the locator to the middle or to the start point.
- Cut = cut the selected spectrum area
- Copy = copy the selected spectrum area into a 'clipboard'
- Paste = paste the spectrum at the locator point.
Process menu
Inverse FFT = to force the editor to generate a waveform from the spectrum . Usualy this feature is automaic when the spectrum is edited by mouse. It erase the previous contain of the waveform buffer
View menu
- Small window = if checked ,reduce the size of the Spectrum editor.
- Grid Edit = Display the spectrum table of values by harmonics. Not editable.
The Spectral Map
The Spectral Map is an alternate view of the wavetable container. It is a knid of resumeof the wavetable contain where each waveform is displayedas a spectrum bar , a bit like a sonogram. The interest of this window is to get a quick resume of the Wavetable contain .This way it is very easy to see if a wavetable is made of synthetic or natural waveforms, or both , simply because their respective spectrums into the map are be completly different : regular and +/- geometrical patterns for artificial/synthetic or pure waveforms , but more noisy and disturbed for natural sounds or audio samples.
Each waveform is displayed as a vertical colored bars who represent the spectrum ( frequency /magnitude or frequency /phase angle ).The bottom of each bar is the lowest spectrum harmonic ( rang 0 = fundamental harmonic )and the top is the highest harmonic ( rang 127) . The magnitude value of each harmonic ( resp phase angle ) is defined by the density of black /white color of each bar : black = 0 , white = full magnitude 100% , and a grey level a value in between both ...
There are 2048 selectable bars into the Spectral Map, grouped by 'squares' of 64 bars. Each 'square' is a wavetable bank, so there is 32 squares in total. When a waveform is edited or a new wavetable is loaded or received by MIDI , the Spectral Map is automaticaly updated. When a waveform is selected into the wavetable editor , the relative spectrum is selected into the Spectral Map.
The Spectral Map also allow the user to perform some very interesting and musical operation working on the whole wavetable. The Tonal Morphing operation ( thanks Grant ;) ) is one of them . This function sort the wavetable by spectrums comparison ( magnitudes and phase ). The one with the lowest frequency first and hi freq/noise density ones at the end . It is a very musical feature when the Quantix-8 is used as a wavetable oscillator with a heterogenous wavetable contain.
The Spectral Map can also be filled directly by the Fractal generator to transform graphical bitmap pictures into waveforms to fill the wavetable . Many others features will be added to the Map in future releases of the Quantix-8 Editor.
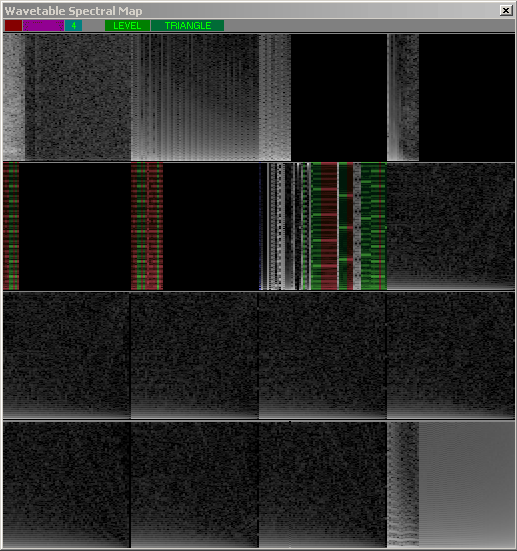
Mouse operations on the Spectral Map :
- Left clic and drag = set/unset the selection rectangle.
- Left clic = select the active waveform into the wavetable and the Spectral Map
Toolbar items, from left to rigth
- Dark Red number = Max number of displayed rowsinto the Spectral map .
- Purple number = organisation of the Spectral map display in 'squares' hrizontal x vertical '
- Green number = Select the horizontal size of each spectrum into the Spectral Map
- Level (or Angle) selector = Choose between the Amplitude or the Phase Angle display of the Map
- 'Triangle' =Select the Windowed function of the FFT for the Spectral Map. This setting is fully independant of the Spectrum editor setting..
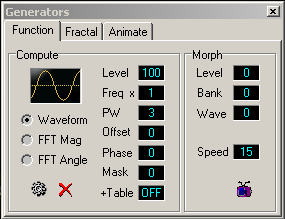
Generators
Math functions
This generator is used to synthesze many classic waveforms often used with musical synthesizers .
The Compute group :
To compute automaticaly a waveform , just clic on any controls of the filed compute . The Waveform buffer will be instantly filled with the computed waveform . The destination memory of the computed waveform can be changed by the radio switches , so it is possible to fill any of the Spectrum editor buffers too.
Computed waveforms are : sinus , triangle, saw up and down, square, pulse , noise , random/s&h ,DC voltage ...
'+Table' (set off by default) : add the computed waveform with the last selected waveform into the wavetable. It is a kind of additive synthesis ...
The Morph group :
This panel is used to compute waveform's linear morphing .
The last selected waveform ( the source ) is morphed with the waveform located by the Bank/Wave label pots ( the destination). The waveform buffer is filled with the result.
Change Level label pot value to morph from a waveform to a another.
A real time animator ( the TV button) simulate the morphing automaticaly.The animation speed is set by the Speed label pot .
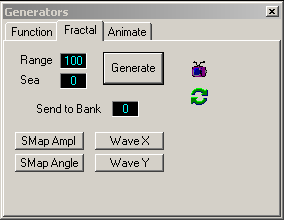
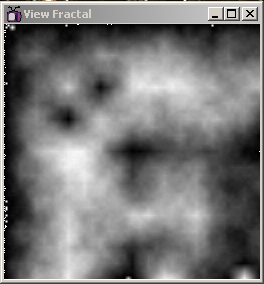
Fractals synthesis
This generator compute and draw 'fractal mountains' displayed into a square bitmap image with grey level pixels ( 0 = dark , 255= white ) .Pixel rows (X ) or columns( Y ) can be send to fill the Wavetable or the Spectrum Map Magnitude or Angle. In all case a set of 2 to 4 banks are replaced into the wavetable.
The starting bank number where to copy the fractals waveforms is set by the 'send to bank' label pot
Range and Sea modify the fractal generator's setup. Manipulate them with care ...
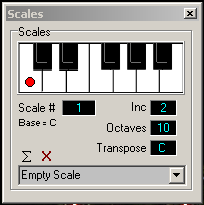
The scale editor
Theoricaly used to generate +/- tempered scales for 1V/Oct CV Quantizer applications, it is also a good ramp stairs generator ...
Clic on the piano to add or remove notes to a scale .The Waveform buffer will be filled automaticaly with the new scale .
This module is also used to analyse if a waveform is a scale when the Scale real time detection is activated (see waveform editor menu ) .
It is possible to store preset scales and to give them a name . Use the (sigma ) button to add a new preset to the scroll menu . The (X) button is to erase the current one. Preset scales are into the scroll menu at the box bottom.
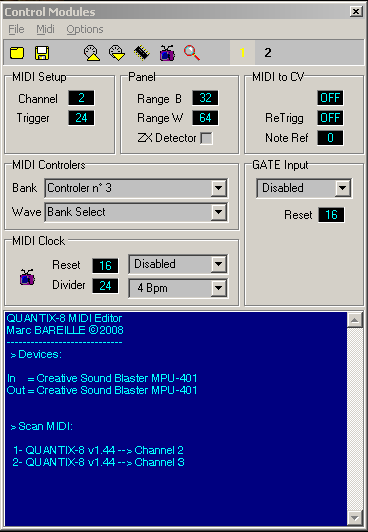
The modules control box
Use the Quantix-8
Real time edition
Dump Wavetable/banks
CV-Quantizer
Wavetable Oscillator
CV-Sequencer
Sample Player
Midi to CV interface
Zero crossing detector
MIDI
Wiring module(s)
Configuration
Implementation chart
Troubleshooting
|
|